-1.png?height=120&name=ShareBuilders%20Logo%20(07052023)-1.png)
ShareBuilder CRM is now able to send mail as any user in your Office 365 server. These settings are not required if your Exchange server is hosted on a private server.
Setup Overview
-
Office 365 Credentials
-
Setup an Office 365 SMTP Relay
-
Prevent emails being marked as SPAM by setting an SPF record.
1. Office 365 Credentials.
ShareBuilder CRM must be provided a new or existing team member Office 365 username and password in order to authenticate with Microsofts hosted exchange servers. ShareBuilder CRM recommends that a new Office 365 team member is created and dedicated to this use. This is required to send ShareBuilder CRM eMarketing emails through Office 365. Please provide the following Office 365 team member credentials to ShareBuilder CRM
-
Email Address
-
Password
2. Setup an Office 365 SMTP Relay
Sign in to Office 365 as an administrator.
-
Select Domains. Make sure your domain, such as wxxx.com, is selected.
-
Click Manage DNS and find the MX record.
-
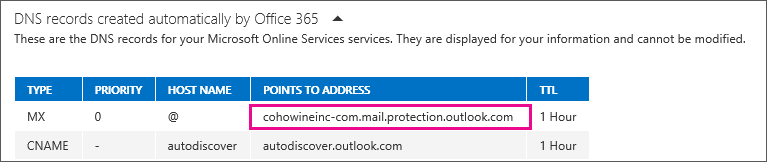
The MX record will have a POINTS TO ADDRESS value that looks similar to cohowineinc-com.mail.protection.outlook.com as depicted in the following screenshot.
-
Make a note of the MX record POINTS TO ADDRESS value. You'll need this later.
Check that the domains that the application or device will send to have been verified. If the domain is not verified, emails could be lost, and you won’t be able to track them with the Exchange Online message trace tool.
In Office 365, click Admin, and then click Exchange to go to the Exchange admin center.
In the Exchange admin center, click mail flow, and click connectors.
-
To start the wizard, click the plus symbol +. On the first screen, choose the options that are depicted in the following screenshot:

-
Click Next, and give the connector a name.
-
On the next screen, choose the option By verifying that the IP address of the sending server matches the IP address 209.143.67.98 that belong ShareBuilder CRM, and add the IP address 209.143.67.98
-
Leave all the other fields with their default values, and select Save.
3. Preventing emails from being marked as SPAM
Now that you are done with configuring your Office 365 settings, go to your domain registrar’s website (such as godaddy.com) to update your DNS records.
-
Edit your SPF record. Include the ShareBuilder CRM IP address 209.143.67.96/28
-
The finished string should look similar to this:
-
v=spf1 ip4:209.143.67.96/28 include:spf.protection.outlook.com ~all,
-
Skipping this step can cause email to be sent to recipients’ junk mail folders.
Let us Know
Once the following steps are complete please provide the required information to one of our team members.