-1.png?height=120&name=ShareBuilders%20Logo%20(07052023)-1.png)
Pulling Natural Log Traffic Reports for ShareBuilder CRM
About this Document
The purpose of this document is to outline how to pull financials from Natural Log in the format required for your CRM launch with ShareBuilder CRM.
Forecast Report
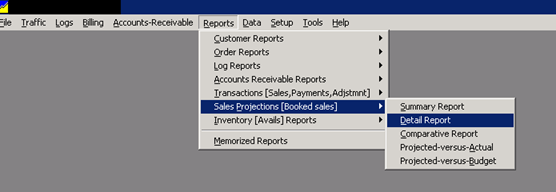
1. Click Reports->Sales Projection Reports [ Booked Sales]->Detail Report
2. Choose General Options
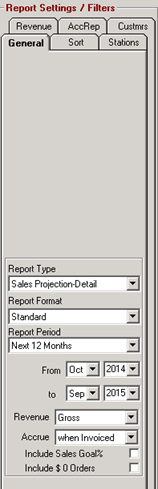
a. Report Type=Sales Project – Detail
b. Report Format=Standard
c. Report Period= Next 12 Months
d. Your management team will define Gross vs Net.
e. Accrue “when Invoiced”
f. Do not include Sales Goal or 0$ orders
3. Click Sort Tab
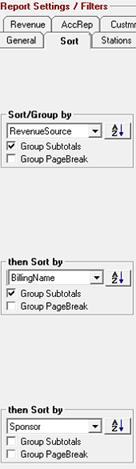
a. First option = Revenue Source with Group Subtotals
b. Second option = Billing Name with Group Subtotals
c. Third option = Sponsor NO SUBTOTALS
4. Revenue, AccRep, Customers, and Stations tabs should all be included unless instructed otherwise.
5. Click File->Customize->Columns
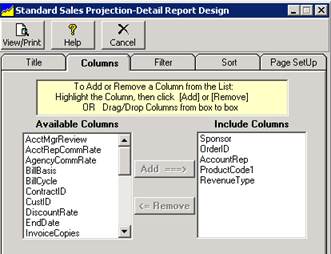
a. Include the following columns
i. Sponsor
ii. OrderID
iii. AccountRep
iv. ProductCode1
v. RevenueType
6. Click “Get Report” under Report Settings/Filters
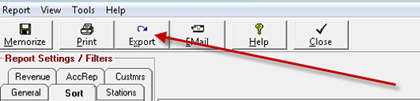
7. When you see the report on the screen, click Export at the top left:

8. Save File as a “Spreadsheet (*.CSV)”. We recommend creating an ShareBuilder CRM folder on your desktop for quick reference. For the filename, we recommend entering “ShareBuilder CRM Forecast 10 12 2013” where 10 12 2013 is the Month Day Year

9. When the file completes the export process, you may now upload the file to ShareBuilder CRM.
Billing History Report
The Billing History report is used anytime historical dollars need to be uploaded to ShareBuilder CRM. This report should never include the current or future months.
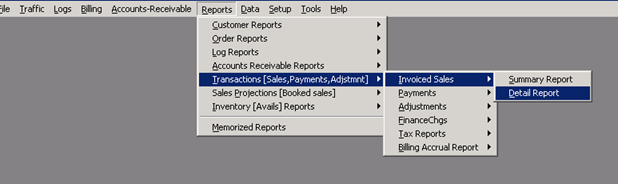
1. Click Reports->Transactions->Invoiced Sales->Detail Report
2. Report Settings/Filters General Tab, confirm settings:
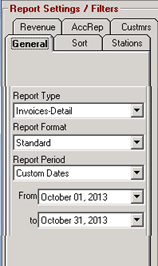
a. Report Type = Invoices – Detail
b. Report Format = Standard
c. Report Period Customize to the dates of this history you are trying to pull. You can pull up to 12 months at a time. We typically recommend pulling this report one year at a time.
3. Click Sort Tab

a. First option = AccountRep with Group Subtotals
b. Second option = Sponsor with Group Subtotals
c. Third option = blank
4. Revenue, AccRep, Custmrs, and Stations tabs should all be included unless instructed otherwise.
5. Click File->Customize->Columns

a. Include the following columns
i. Sponsor
ii. InvBillingName
iii. InvRevenueSource
iv. InvRevenueType
v. InvDate
6. Click “Get Report” under Report Settings/Filters
7. When you see the report on the screen, click Export at the top left:
8. Save File as a “Spreadsheet (*.CSV)”. We recommend creating an ShareBuilder CRM folder on your desktop for quick reference. For the filename, we recommend entering “ShareBuilder CRM Billing History Oct 2013” to indicate the file type and Month or months. Be careful not to use a “.” in the file name.

9. When the file completes the export process, you may now upload the file to ShareBuilder CRM.
Did this answer your question?