This article will explain how to add an activity, a follow-up activity or a recurring appointment
Activities provide historical information and progress on accounts. The dropdown displays the most relevant activity types for your company.
There are two starting points where you can Add an Activity.
1a. Click the Quick Add button found in the top banner of any CRM page:
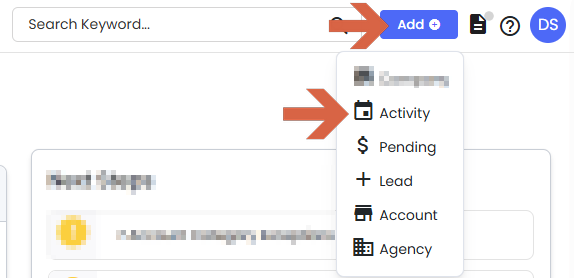
1b. From Activities List - Actions Menu - Add New

You want to enter the information under the Activity Details tab. To associate this activity with an account, contact, or agency, enter a few letters under the Companies and Contacts bar to pull up the choices. You can select one or multiple associations.
The follow-up tab allows you to schedule another activity for the same account, contacts, or agencies. Be sure to save after your entry using the SAVE button. That will document the activity on your calendar as well as the activity tab under the account summary.

What are the Activity basics?
Any user can add an activity for any account, regardless of ownership.
Activities can also be linked to agencies without associating them with specific accounts.
To associate one activity with multiple accounts, especially when discussing initiatives with an agency representative that pertain to several accounts, utilize the feature that allows linking an activity to multiple accounts.
Who can see Activities?
An activity related to an account can be viewed by:
The owner of the account.
The creator of the activity.
Sellers on a shared account.
The user is listed in the “Activity For” section.
An activity added for an agency can be seen by all users.
An activity created for a contact, not associated with an account, can be seen by all users.
Who can edit an Activity?
An activity may be edited by:
The user who created it.
The individual for whom the activity was created.
Any user with Manager permissions.
